- Carpool Balancer
- T42 - Tennis for Two
- Touch Tabletops
- Little Fairy's Adventures
- GenAJA
- Tutorials
- Impressum
Carpool Balancer - Manual
The manual is contained within the app. This is the manual for the iPhone version of the app. For the iPad app there's an adapted version.
Content
PurposeConfiguration
Usage
Options
Examples
Purpose of this app
The Carpool Balancer helps you to keep track of how many miles (or kilometers) each member of a car pool has driven. Thus, you can easily determine who's driving next. The app calculates bonus and "malus" miles for each driver every time that you enter the data of a tour (who drove and who were the passengers). A tour can have several meeting points where passengers are picked up or become the new driver. The app still keeps track of each member's covered miles.
Only one person of the entire car pool actually needs this app! The app cannot share its data with other installations on other devices. So, there's only one person per car pool in charge of recording the tours.
topConfiguration
- add drivers
- measure and add distances
What you need to do before starting to use Carpool Balancer is to measure the distances between each meeting point. What unit you use, i.e. miles or km, does not matter.
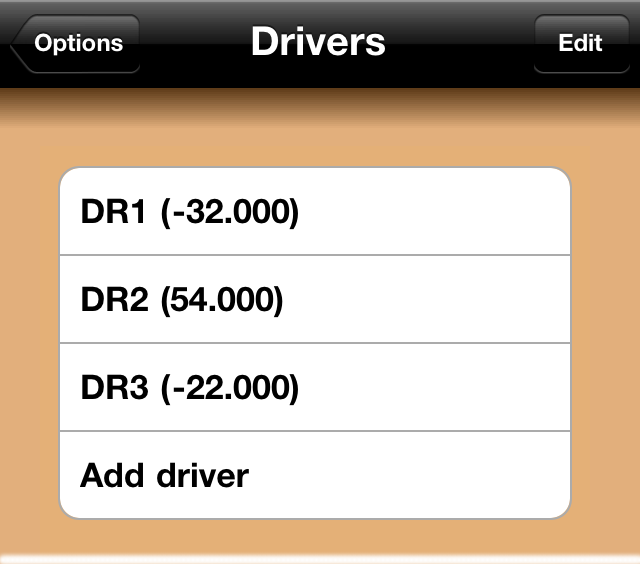
To begin, first click on the 'Options' button (in the lower left corner showing two cogs). Then click on 'Drivers'. On the following screen you can add all the drivers of your car pool. Enter the initials of each driver. On an iPhone the maximum number of drivers would be six. The iPad version of the app can display up to ten drivers in the table.
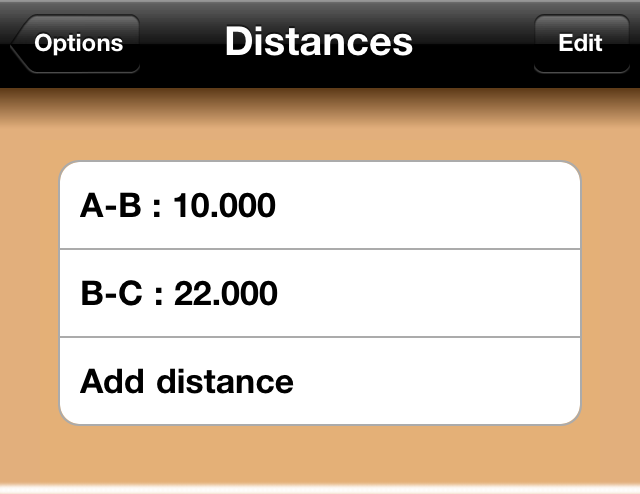
Then go back to 'Options'. Click on 'Distances' to add all paths. A path is the distance from one meeting point to the next or to the target location. Define the distance in only one direction (not round trip). Enter a name for each distance. You have to measure the distance between each meeting point and then enter this value here. The unit - whether km or miles - is not important. You just have to be consistent. On an iPhone the maximum number of distances is six. The iPad version can display up to nine distances in the table.
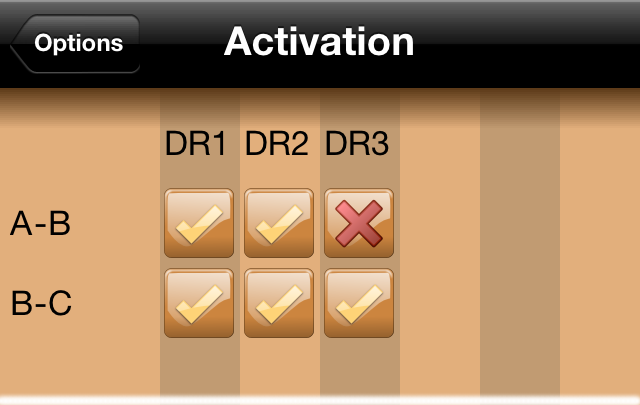
Then go back to 'Options'. There, you can click on the 'Activation matrix' button. It will lead you to a matrix of buttons with two states: 'enabled' (hook) or 'disabled' (cross). Here you can decide for each driver (each column) whether he or she really ever drives certain distances. If that is never the case you can disable those distances for him or her. The corresponding buttons in the matrix on the main screen will be hidden. This facilitates oversight of driving assignments.
Usage
- select driver
- select driver's path
- select passengers' paths
- click on 'Log' button
Now, that you have entered all the data you can start to log every tour of your car pool. On the start screen select the driver by clicking on the corresponding button. Below that button the column of buttons belonging to the distances are enabled, showing a road icon. Now, select all the distances which were driven. Those buttons will show a steering wheel icon.
Each time a distance is selected for the driver all the buttons in that row are enabled, too. So for each distance the driver has covered you can now select the passengers. Their road icon will turn into a car icon.
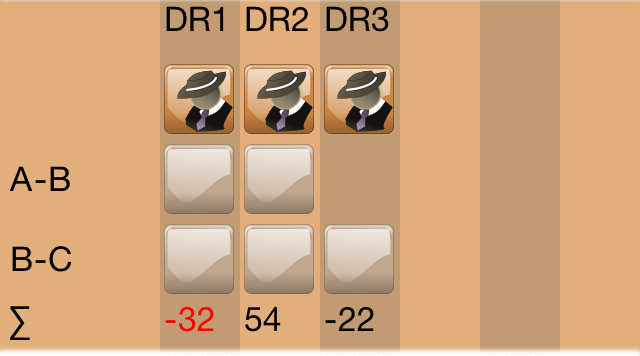
Finally, press the 'Log' button (lower right corner with a hook icon) to record this tour. Now, the app calculates the bonus miles (or km - the unit does not matter) for the driver and the "malus" miles for each passenger. For each segment, the driver earns the distance value multiplied by the number of passengers added to his or her sum of covered distances which is shown at the bottom of his or her column (marked with a greek sum sign ∑). Each passenger gets for each distance the (single) value subtracted from his or her sum of covered distances.
Finally, all selected buttons are reset and the lowest value of all covered distances is displayed in red in the bottom row of the matrix. This makes is easy to determine who should drive next.
If you selected a driver, his or her path, and made some other selection and then click on another person's driver button all selections are going to be cleared and you have to log this tour from his or her point of view (as a driver and not as a passenger).
topOptions
- enter email address
- add/edit/delete drivers
- add/edit/delete distances
- history
On the main screen you can click on the email button to send the current status together with the name of the driver who should drive next.
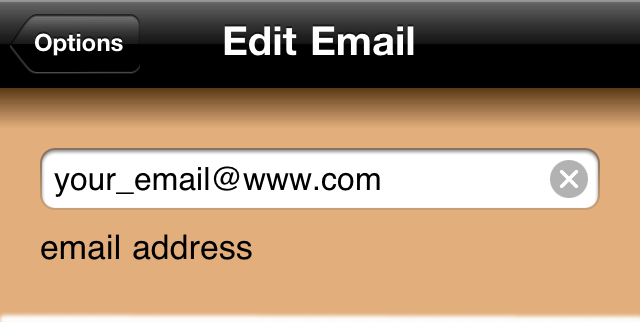
On the 'Options' screen you select 'Email address' to enter an email address which is used when the email dialog is activated. Otherwise you must choose an address from your contacts.
In order to remove drivers from the list, choose 'Options', then 'Drivers' and click on 'Edit'. Then click on the red (-) button next to the driver's name and confirm the deletion. The same is true for distances.
Under the drivers table there is a button "reset all covered distances" (of all drivers). Before this reset is executed you have to confirm this action.
In order to edit drivers or distances select them in their table. Their values are shown on an extra screen. Now click on 'Edit' and start changing the values. After editing confirm your changes with 'Done' or click on 'Cancel'.
The history is a the complete list of all actions (adding/removing drivers or distances, logging tours, or reseting all covered distances) together with the date.
topExamples
Simple exampleJust one start and one end point
Example 1: Simple example
In this example there are three drivers: DR1, DR2, and DR3. DR1 and DR2 meet at meeting point A, from there they drive to meeting point B where DR3 gets into the car, and all three of them drive to the target location C. That makes two distances: "A-B", which is 10 km long, and "B-C", which is 22 km long. The complete path from A to C is therefore 32 km long. The number of distances is probably always at least one less than the number of drivers.
After entering all three drivers and the two distances you can go to the activation matrix end disable distance "A-B" for DR3 since he will never drive that path. In case this might actually happen just enable that distance again and you can log the tour on the main screen as wished.
Let's assume DR2 drives in the morning to A where DR1 gets into his car. Both drive to B where DR3 joins them before they drive to C. In order to log this tour click on DR2's driver button, then in the column below on the buttons for A-B and B-C (the buttons show now a steering wheel). Now, click in DR1's column on the buttons for A-B and B-C (the buttons show now a car). And finally, click in DR3's column on the button for B-C before clicking on the log button (with the hook) in the lower right corner.
On another day DR1 drives with DR2 to meet DR3 at B. But now DR3 takes over and drives with the others to C. To handle these events you need to separately log two tours. First, click on DR1's driver button and his A-B distance button. Then click on DR2's A-B distance button before finalizing this tour with a click on the log button. Now click on DR3's driver button and his B-C distance button. To input his passengers click DR1's and DR2's B-C distance button. Then click on the log button and you are all set.
Example 2: Just one start and one end point
If all drivers meet at one location to always drive to the same target location you only have to enter only one distance. Even the value of the measured distance does not really matter. You can enter 1 (the number must be > 0). After every driver drove this path with the same number of passengers the sums of all covered distances will be 0 again.
top(C) by n-o-d